The number of WiFi networks in the world to grow and if we live in an urban area it is very possible that when we seek networking from our Mac or iOS devices, the list is big enough. This can cause that our teams have doubts on that networks connect is and by this in the following lines are going to explain how prioritize them networks WiFi in Mac.
Thanks to this are going to get a best performance of the networks wireless and also that the team is connect automatically to them networks of our choice and not to others to which perhaps us connect in some time punctual.
Thanks to iCloud WiFi networks to which we connect are synchronized in all our devices. This wants to say that if, for example, us connect to a network from our iPhone, the same network will be shown in our Mac and the team is can connect automatically in case of what it detected.
In principle this are good news, although in some occasions can get to generate problems, especially when are away from the network and the signal arrives with little intensity, since could cause us falls constant and make that the team not is connect to the network that should of form automatic.
To avoid this type of behavior, and taking in has that each time use more them networks WiFi to connect us, must take you a hand to the management of networks of macOS and occasionally make a Optimization manual. Is a process simple that consists of two parts:
1 delete the WiFi networks that we are not going to be reused
The first part consists in eliminating them networks that not go to return to use. Is very common keep networks to which us connect in some travel or similar and that it more likely is that never more go to use, remove them from the list of networks known can be a good idea, especially if have names common.
For it must do the following:
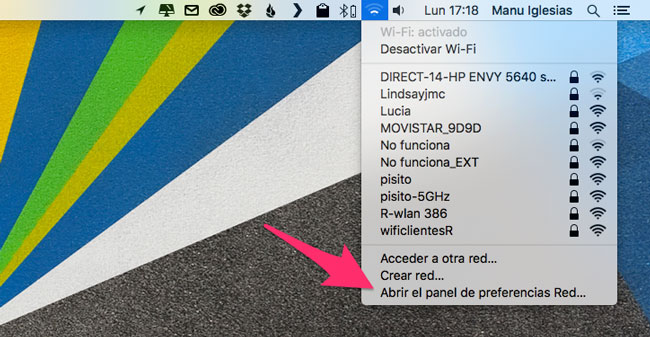
1.-open preferences of the system and click on network. Another option is to click on the icon of the WiFi in the menu bar and choose the option to Open the network preferences panel.
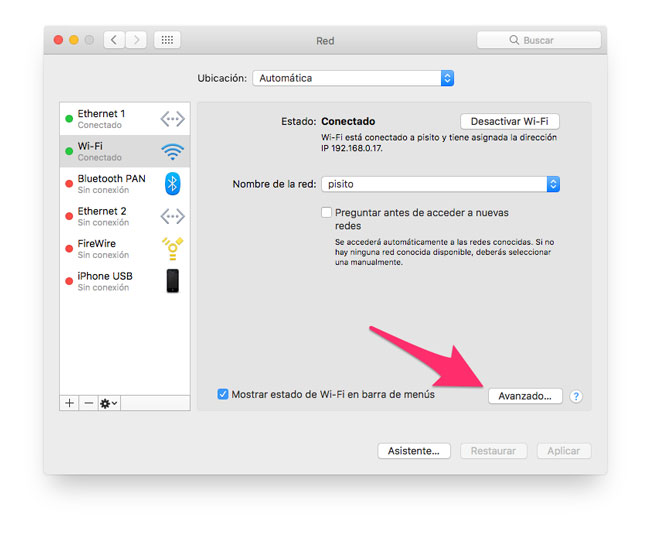
2.-Select the connection WiFi in the list of the left and then click on the button Advanced…
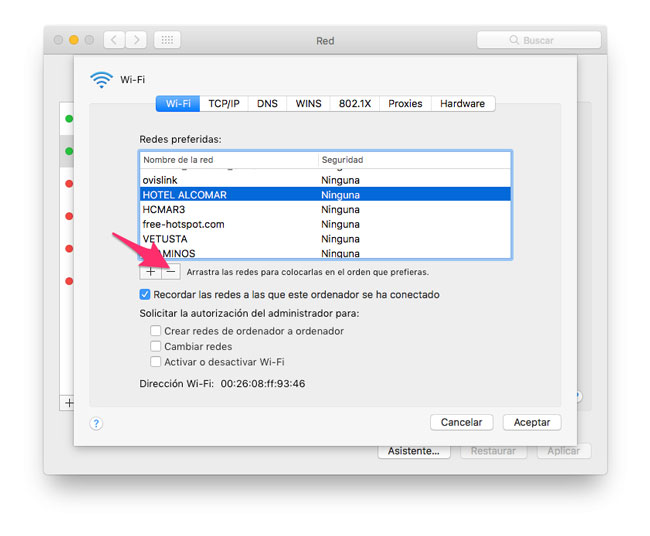
3.-now us will show the list of networks WiFi and it only that must do is select which want delete and click on the icon-that appears just below the list. Repeat this point until eliminating all the networks to which do not believe that go to connect us more.
Set the priority that we give to each stored networks
The second step, once eliminated the networks that already we will not connect, it is set the priority to which Yes save the configuration. Make it is very simple and just with sort the list of which want to give more priority to which less.
The steps to follow are these:
1.-open preferences of the system and click on network. Another option is to click on the icon of the WiFi in the menu bar and choose the option to Open the network preferences panel.
2 Select the WiFi connection from the list on the left and then click on the button Advanced…
3 click on the network to which you want to change the priority and drag it to the position we occupy without releasing the mouse button. Once placed in the correct position release the mouse button.
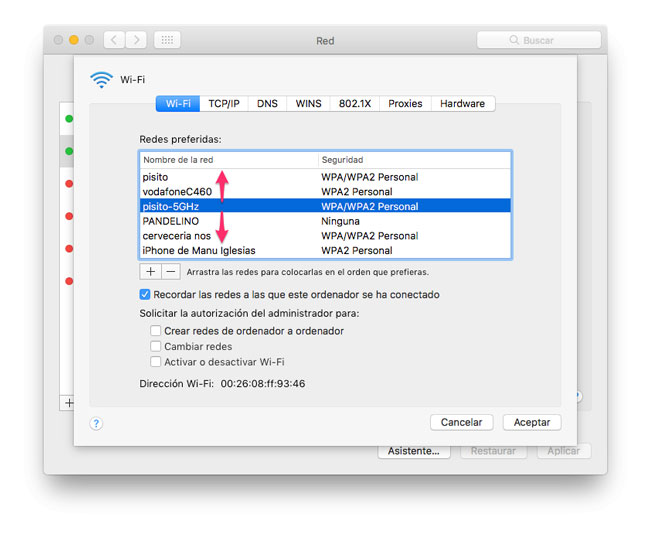
Once you have ordered the list to our liking, we click on the OK button to exit the window and Mac manage connections to WiFi networks with the priorities we have set.
In TodoAppleBlog | Tutorials Mac